What is B-roll? Plan useful footage for product videos
Plan extra footage that helps explain the product or supports what the person is saying. Write down which line or action each shot goes with.
Study the action a supporting shot explains
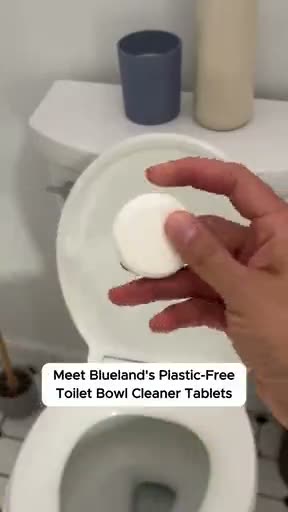
Give a supporting shot a precise job
Blueland shows the product and the tablet being handled. Use the snippet to discuss which action you need beside a line of explanation. We don’t have the full spoken script here.
What to look for: Which line would this action help a viewer understand?
Try this: Plan supporting coverage beside the exact line, and record the complete action.
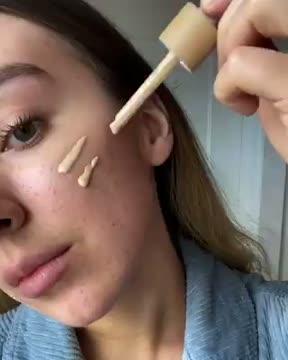
Show the application clearly
The ILIA snippet shows a dropper-to-cheek action followed by hand blending. The visible application is useful coverage for explaining use. It cannot substantiate wear time or a skin benefit.
What to look for: Where does a detail view explain more than a talking head?
Try this: Capture the whole application and a separate detail without changing the product state.
B-roll is supporting footage that gives the main story something useful to show. In a product video, that might be a hand opening a refill, a close-up of a texture or a wider view of the product in use. We use references to study what a shot explains, then turn that observation into our own capture plan.
What B-roll does in a product video
Adobe describes B-roll as footage that supplements the main clips, helping establish a scene, add meaning or smooth a transition. A-roll carries the central action or presentation. A product demonstration can carry the story or support a presenter’s explanation.
If you cut this shot, what would be harder to understand? A close-up can clarify how a lid moves. A wider shot can locate the product on a crowded counter. A cutaway can bridge 2 spoken takes. If the answer is only that the shot looks attractive, decide whether that visual pause deserves its place.
Start with the line, then choose the picture
Start with the line you need to explain, then choose the shot. If the line is about adding a refill, show the tablet in the hand and going into the bottle. The angle should help someone follow that action.
The short Blueland and ILIA snippets show tablet handling and cosmetic application. Use those visible actions to discuss framing and sequence. Choose a different action for your own product, rather than treating another advertiser’s demonstration as evidence for your claim.
Capture context, action and detail
Get a wide view that shows the setting, a shot of the action and a closer view of the useful detail. Opening, attaching or applying the product gives the editor more to work with than several similar product shots.
For a desk lamp, a context shot could show the working surface, the action could show the switch being operated, and the detail could show the joint being repositioned. Record the full movement first. Keep close-ups connected to the wider task.
Make the coverage support the exact claim
A picture of water beside a sealed mug does not demonstrate that the mug will stay sealed in a moving bag. A hand applying a product shows application, not its eventual effect. Write down the smallest claim each planned shot can support, and give any stronger claim its own evidence requirement.
Ask for a close-up of the hinge opening and closing, and keep it visible through the full movement. Now the filmmaker knows what to shoot and the reviewer knows what to look for.
Protect continuity while filming
Keep the product state consistent across angles. An editor cannot easily join a full bottle to an almost empty one, or a hand approaching from the left to a close-up that unexpectedly reverses the movement. Note the amount of product, hand position, object orientation and background items before resetting.
Leave usable material before and after the action, then capture the complete action again when the first take obscures something important. Do not make every movement slower merely because slow motion looks polished. Choose a pace that lets the viewer understand the actual task and gives the editor room to cut.
Build an edit with a reason for every cut
Build the main explanation first. Add B-roll where it shows a step or detail the viewer needs. Put the close-up beside the line it explains. Check that the product and direction of movement stay clear as you cut between shots.
Watch the sequence once without sound to check whether the actions connect, then listen without looking to check whether the explanation stands up. Revise the picture or line where the 2 disagree.
Exercise: replace a vague request with a shot assignment
Start with the direction “Get some nice shots of the mug.” Rewrite it as a short sequence with a job for every view: identify the mug, show the closure, reveal the opening and place it in one everyday setting. Add the spoken line, framing, full action and continuity note beside each shot.
Now remove the least useful view. If the explanation still works, keep the shorter plan. If a necessary detail disappears, restore that view and state the missing information. Assign a reviewer to check the filmed sequence against the plan.
Use the worksheet
The completed example separates what we can see in the ads from our own plan. Use the blank worksheet for your product details, supporting sources and the people reviewing the work.
Start with the blank worksheet, or read the filled-in example to see how to use it. You can copy either one.